How to Flush an Outboard After Saltwater Use
Table of Contents
- What Salt Actually Does Inside Your Outboard Motor
- What You Need Before You Start Flushing Outboard Motors
- Outboard Engine Flush Port: The Faster And More Reliable Alternative
- What To Do When You Do Not Have A Hose
- How To Flush An Outboard Engine: Step-By-Step Guide
- How Long To Flush After Saltwater And Other Water Type
- Flushing By Motor Type: Carbureted, EFI, and Electric
- Five Flushing Mistakes That Make The Process Ineffective
- When to Escalate Beyond Flushing
- Expert advice: consult a technician
- Complete Flushing Checklist
- Flushing is the foundation
- FAQs
Salt doesn't wait. Within hours of an unflushed outing, residual saltwater in your cooling passages begins to crystallize. Over time, that buildup restricts water flow, causes overheating, and quietly corrodes internal components damage that a five-minute flush would have prevented entirely.
This guide covers the full process. What salt and silt do inside a cooling system over time, the different flushing methods and which suits your setup, how long to flush based on the water type you operate in, the differences between carbureted, EFI, and electric outboards, and the five mistakes that make flushing ineffective even when owners think they have done it right.
If you run an inflatable on the Chesapeake Bay, its tributaries, or any tidal or estuarine water, this applies directly to your setup.
What Salt Actually Does Inside Your Outboard Motor
Your outboard cools itself by drawing raw water through internal passages to absorb engine heat, then expelling it through the exhaust. In saltwater, that water carries dissolved salts and minerals. When the engine shuts off and the circuit drains, the water evaporates, the salt doesn't. It crystallizes on the passage walls, and each outing adds another layer.
Over time, the buildup narrows cooling passages, reduces flow, and forces the impeller to work harder. The result is an engine that runs hotter, wears faster, and eventually overheats under load, often with no warning beyond a weakening tell-tale.
Brackish And Estuarine Water: The More Aggressive Case
Open ocean saltwater is corrosive but clean. Brackish and estuarine water carries dissolved salt plus suspended silt and organic matter, a combination that blocks cooling passages significantly faster. Silt settles in bends where water velocity drops; organic matter can partially decompose inside warm passages between outings.
If you operate in tidal rivers, creek mouths, or shallow tributaries rather than open water, flush longer and more thoroughly than the standard five-minute recommendation.
What You Need Before You Start Flushing Outboard Motors
Outboard Engine Flush Muffs: The Standard Method
Flush muffs are rubber cups that fit over the motor's external water intake ports on the lower unit. They connect to a garden hose and allow the engine to draw fresh water from the hose rather than from the surrounding environment. This is the most common flushing method for portable outboards on inflatable boats and works on the majority of two-stroke and four-stroke motors.
Checking the Size of the Flush Muff Matters
Flush muffs must completely cover both water intake ports to create a seal. Muffs that are too small leave one port partially exposed, which allows the motor to draw air, reducing water flow through the circuit and making the flush incomplete. When buying flush muffs, confirm they are rated for your motor's lower unit diameter; most portable outboards in the 6 to 30 HP range use a standard size, but check before purchasing.
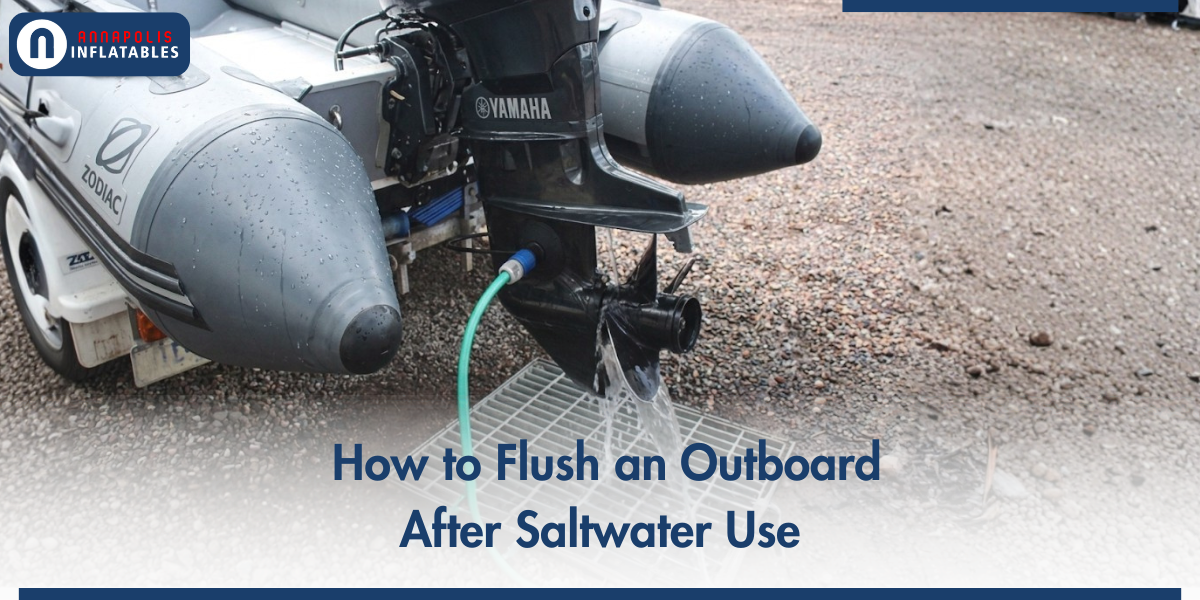
Outboard Engine Flush Port: The Faster And More Reliable Alternative
Many modern four-stroke outboards have a dedicated flush port, a threaded fitting on the motor body that accepts a standard hose connector. This bypasses the lower unit intake entirely and delivers water directly into the cooling circuit under consistent pressure. The seal is more reliable than muffs, and the connection takes seconds. If your motor has a flush port, use it; it is faster and more thorough than muffs.
Outboard Motor Brand Models with a dedicated flush port:
- Yamaha F-series,
- Mercury FourStroke,
- Suzuki DF,
- Tohatsu MFS 15 HP and above,
- The full Tohatsu BFT series.
For all other motors, check your owner's manual for the correct flush procedure.
What To Do When You Do Not Have A Hose
Beach launches, remote ramps, and tidal landings often mean no fresh water source nearby. In this situation, the flush has to wait until you return home, which is acceptable provided you complete it the same day. Salt that has been sitting for several hours is more difficult to clear than salt flushed immediately, but a thorough flush completed the same day is far better than one skipped entirely.
Some owners carry a portable water container and a submersible pump for beach launch flushing. A 20-liter container provides enough water for a five to seven-minute flush on a small portable outboard, which is sufficient for saltwater use. For extended estuarine outings, carry more.
How To Flush An Outboard Engine: Step-By-Step Guide
The sequence matters. Getting the order wrong, particularly turning the engine off before the water supply, can damage the impeller. Follow these steps exactly.

- Step 1: Attach flush muffs centered over both water intake ports on the lower unit. Squeeze them firmly against the lower unit surface to create a seal before turning on the water.
- Step 2: Turn on the water supply fully before starting the engine. The motor must never start without water already flowing; even a brief dry start can damage the rubber impeller.
- Step 3: Start the engine in neutral at idle. Within 30 seconds, confirm a steady tell-tale water stream from the small outlet port on the motor body. This confirms water is circulating through the full cooling circuit.
- Step 4: Run the engine at idle for the full flush duration appropriate to your water type. See the water type guide in the next section. Do not rev above idle during flushing; high RPM on muffs can cavitate and starve the cooling circuit.
- Step 5: Turn off the engine first. Wait five seconds, then turn off the water supply. This sequence ensures the impeller does not run dry even momentarily when the water pressure drops.
- Step 6: Tilt the motor to the full down position and leave it for two to three minutes to allow residual water to drain from the passages. Then tilt to the storage position.
Note: During the flush
Watch the tell-tale stream throughout, not just at startup. A steady stream that weakens mid-flush indicates a partial blockage in the cooling circuit. A stream that stops entirely mid-flush means the impeller may be failing or a passage is blocked. In either case, do not continue using the motor before investigating the cause.
How Long To Flush After Saltwater And Other Water Types

The standard five-minute recommendation applies to open ocean or tidal saltwater with no significant silt load. For other conditions, adjust accordingly.
| Flush duration by water type | |
|---|---|
| Water type | Recommended flush duration and notes |
| Open saltwater | 5 minutes minimum. Standard garden hose flow at full pressure. Confirm tell-tale throughout. |
| Brackish/estuarine | 8–10 minutes. Silt and organic matter require extended flushing to clear. Applies to most Chesapeake Bay tributary use. |
| Silty river/creek | 10–15 minutes. The most aggressive conditions for passage blockage. Flush immediately; do not leave overnight before flushing. |
| Freshwater (lakes/rivers) | 3–5 minutes. Primarily to clear any biological matter. Salt is not the concern here but flushing still protects the cooling circuit. |
How Often Should You Flush Your Outboard Motor
Flushing your outboard after every single saltwater use is the golden rule, no exceptions. Salt crystals begin forming in your cooling passages within hours of exposure, and repeated neglect leads to overheating, corrosion, and costly repairs.
For freshwater use, a flush every 3–5 outings is generally sufficient, but if you've been in particularly murky or silty water, rinse it sooner.
However, regular flushing with fresh water may not be enough if mineral deposits have already started building up inside your cooling system.
The Vinegar Flush: For Existing Mineral Buildup
If tell-tale flow has been progressively weakening, a vinegar flush can dissolve light to moderate mineral scale before it requires professional descaling.
Mix one part white vinegar with three parts fresh water and run this solution at idle for 15 minutes. Follow with a 10-minute plain water flush to clear the acid completely.
Do not use vinegar more than once or twice per season, stronger acid solutions can damage rubber seals and gaskets.
Flushing By Motor Type: Carbureted, EFI, and Electric
Carbureted outboards
Standard flush muff procedure applies. Run at idle for the appropriate duration for your water type. Most portable outboards in the 2 to 25 HP range used on inflatables are carbureted.
Four-Stroke EFI Outboards
Use the flush port if fitted; it provides a more consistent seal than muffs. After flushing, some EFI motors benefit from a brief rev to 1,500 RPM for 20 seconds before shutdown to expel residual water; check your owner's manual.
Electric outboards: Torqeedo and ePropulsion
No combustion cooling circuit; muffs do not apply. Rinse the motor housing, prop shaft, and lower unit thoroughly with fresh water after every saltwater outing. Remove the propeller periodically and apply marine grease to the shaft before replacing. Apply dielectric grease to battery terminals and connectors to prevent salt corrosion.
Five Flushing Mistakes That Make The Process Ineffective

Most owners who flush regularly still make at least one of these errors, each one reduces effectiveness without them realizing it.
- Flush muffs not centered over both intakes: If muffs are off-centre, one intake port stays partially exposed. The motor draws air through the gap, reducing circuit pressure. The tell-tale may still flow, giving a false sense the flush is working, while passages on the uncovered side remain uncleared.
- Stopping too soon: A two-minute flush dislodges loose crystals at the intake but doesn't clear mid-circuit passages, particularly around bends and the thermostat housing. These require sustained flow to dissolve and carry out.
- Turning off the water before the engine: When water stops first, the still-spinning impeller briefly draws air. It lasts only a second or two, but repeated across hundreds of outings it accelerates impeller wear. Always shut the engine off first, wait five seconds, then turn off the water.
- Not watching the tell-tale throughout: A tell-tale that flows at startup then weakens indicates a developing blockage. Watching it for the full duration tells you whether the circuit is genuinely clear or needs attention.
- Skipping the flush after a short outing: Salt crystallization begins as soon as the cooling circuit drains, regardless of how briefly the motor ran. Short outings deposit less salt, but the flush takes the same five minutes either way.
When to Escalate Beyond Flushing
Flushing is preventive. It cannot reverse existing damage or clear significant blockages. These situations require more than a flush.
- Tell-tale flow is weak or absent: The impeller may be failing, or a passage is significantly blocked. Don't use the motor until the cause is identified.
- The motor overheated before you could flush: Heat bakes salt deposits into the passage walls, a standard flush won't clear this. Have a technician descale the cooling system before the next outing.
- The motor was stored unflushed for more than 24 hours: Flush thoroughly, follow with a vinegar flush if tell-tale flow seems reduced. If the flow remains weak after both, consult a technician before further use.
Expert advice: consult a technician
If tell-tale flow remains weak or absent after a thorough flush, or if the motor has been stored unflushed for more than a few days, have a certified marine technician at Annapolis Inflatables inspect the cooling system before the next outing. Running an outboard with restricted cooling flow risks powerhead damage that costs significantly more to repair than a preventive service call.
Complete Flushing Checklist
Save this checklist, run through it after every saltwater or estuarine outing to keep your outboard's cooling system clear and your motor running efficiently.
Before you start the flush
- Flush muffs centered over both lower unit intake ports, check the seal
- Fresh water supply connected and ready, confirm flow before starting
- Motor in neutral
During the flush
- Turn water on fully before starting the engine
- Start engine, confirm tell-tale flow within 30 seconds
- Run at idle only, do not rev on flush muffs
- Maintain flush for correct duration based on water type
- Watch tell-tale throughout, it should remain steady
After the flush
- Turn off engine first, wait 5 seconds, then turn off water
- Tilt motor to full down for 2–3 minutes to drain residual water
- Return to storage position
Flushing is the foundation
A five to ten-minute flush after every saltwater outing is the single most protective routine maintenance step available to an outboard owner, and the one that requires the least time, tools, or skill. Done correctly and consistently, it prevents the progressive cooling passage deterioration that leads to overheating, efficiency loss, and premature engine wear. Done incorrectly, or skipped, it is one of the most common contributors to outboard failures that reach a service center.
For professional outboard servicing, cooling system inspection, and seasonal maintenance in the Annapolis and Chesapeake Bay area, visit Annapolis Inflatables at annapolisinflatables.net.
FAQs
Can I flush my outboard without running the engine?
No. Without the engine running, the impeller doesn't circulate water through the internal cooling passages. The engine must be running on flush muffs or a flush port for it to work.
My outboard has been sitting unflushed for a week. How long can you leave an outboard without flushing?
Flush now using extended duration, then follow with a vinegar flush. Watch the tell-tale carefully, if flow is weak or intermittent, have it inspected before the next outing. Running with restricted cooling risks significant internal damage.
Does flushing affect lubrication or the fuel system?
No. Flushing only clears the raw water-cooling circuit and has no contact with the fuel, oil, or electrical systems.
How to flush a Mercury 4-stroke outboard?
Mercury 4-strokes can be flushed two ways, via the flush port (a dedicated fitting on the motor, no muffs needed) or with flush muffs over the lower unit intakes. Connect a garden hose, start the engine, and run at idle for at least 5–10 minutes until the tell-tale runs clear and steady. Shut the engine off first, then the water. Consult your model's manual as flush port location varies across Mercury's 4-stroke lineup.